By no means, would I call this a definitive guide, but perhaps some personal preferences that I have acquired over time. I'm sure they will evolve as fresh ideas emerge and innovative new products serve the needs of this ever changing sport. But for now, I'd like to share the set up I used to shoot footage over the past two years along with some new items that I've acquired. I will use scenes from my last video,
Addiction: Kayak Fishing, to refer to some of the angles I'll be talking about. Although it was a lot of work putting it together, I found it very rewarding to look back, relive and share those cherished moments on the water.
A little background info... The cameras I used were the Olympus Tough 8010, GoPro Hero standard definition, and GoPro Hero HD. The Olympus is my point and shoot photo camera as well as a decent 720p video camera with sound. It has little to no wide angle effect and a short zoom. It's not the best camera out there for shooting video, but it gets the job done for now. I retired the standard definition GoPro recently and upgraded to the HD Hero2. GoPro no longer carries the standard definition cameras anymore, and I found the quality to be quite inferior to the HD. But I still used it anyway because I wanted as many angles as I can. The Hero HD is a great camera and most of the crisp clean shots in the video were taken by it. I look forward to testing out my new HD Hero2 as I hear it's even better.
The first thing I'd like to mention is that putting the camera mounts in places you can reach is very important. Being able to turn them off and on is definitely a good thing. I understanding that some cameras come with a remote and GoPro is coming out with a remote system as well, but it's still a good idea to be able to access them. You will have to change out batteries, switch modes, etc. at some point.
With that being said, the mounts I have toward the front of the kayak are as follows:
A. I bolted the helmet strap attachment that came with my GoPro to the Sonar Shield on my OceanKayak Trident. The scene that starts at 1:30 is the view you get from that mounting point. It's very flat to the deck, which I think is a cool view. You can raise the Sonar Shield while using a depth finder and have the camera a slightly higher angle as well. Unfortunately, in the video, I was using the old standard definition GoPro, so you will notice the lower video quality.
B. YakAttack Mighty Mount attaches to the hull using 4 bolts, washers and nuts. A T-bolt slides into the slot and screws into the bottom of the PanFish Portrait (also show in right of picture). The wave crashing over the bow, the spade fight scene that starts at 0:51, along with many more clips were shot from that angle using the Hero HD.
C. Another Mighty Mount was mounted toward the front of the hatch to create a little more distance and a more straight on view. Although cropped in, the first sheepshead fight at the beginning of the video was shot from this mount. It was a cloudy/rainy day, so the lighting wasn't so great, even with the Hero HD. I hear the Hero2 does a better job in low light conditions.
D & E. YakAttack recently came out with the Gear Trac which comes in 4" increments up to 16". I attached two 8" tracks with the stainless steel thread forming screws that came with it. That means you don't have to reach behind and use bolts. Just line up the trac, use the provided drill bit for pilot holes and drive in the thread forming screws. The versatility of the Gear Trac is really quite amazing. As you can see in the picture, I have the Panfish Portrait attached to the trac, but it can also be used with any RAM ball accessory, various rod holders and can serve many other functions. For more info check out
this video. I don't have any shots taken from these angles, but I plan on using them extensively in the coming season.
For the rear of the kayak, I like having the camera up a little higher than most, so I attached the YakAttack Panfish to my crate using Mighty Mount screwed in each corner.

Scenes from behind were all shot from one of the two mounts. The tog hook ups at 2:21 and 2:53 along with the tunnel at 2:35 and the splash at 3:16 are prime examples.
As I eluded to earlier, some of my preferences have already started changing. With the introduction of the Gear Trac, I can use the entire length of the crate and not just the corners. I was planning on using a piece of a cheap cutting board to use as a surface for the Gear trac to attach. But being the problem solver that he is, Luther Cifers, owner of YakAttack, created a piece of plastic to fit just right. I doubt he's going to go full production with the piece, but if you think this set up is right for you, you can probably make a similar one with a cheap cutting board.
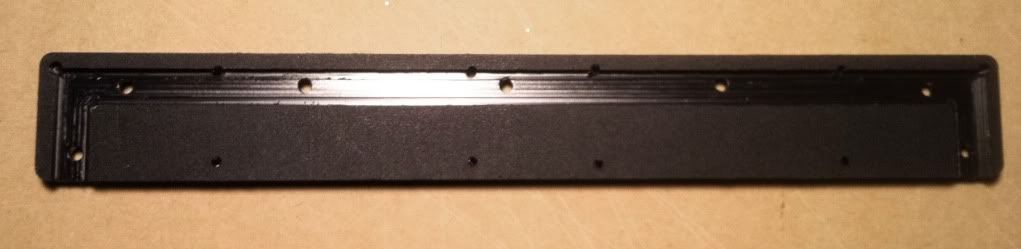 |
| Bottom |
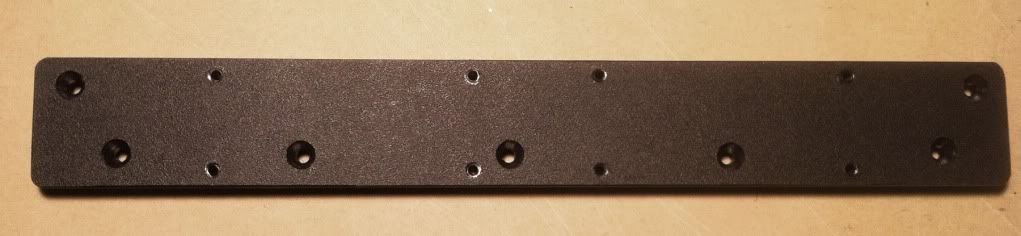 |
| Top |
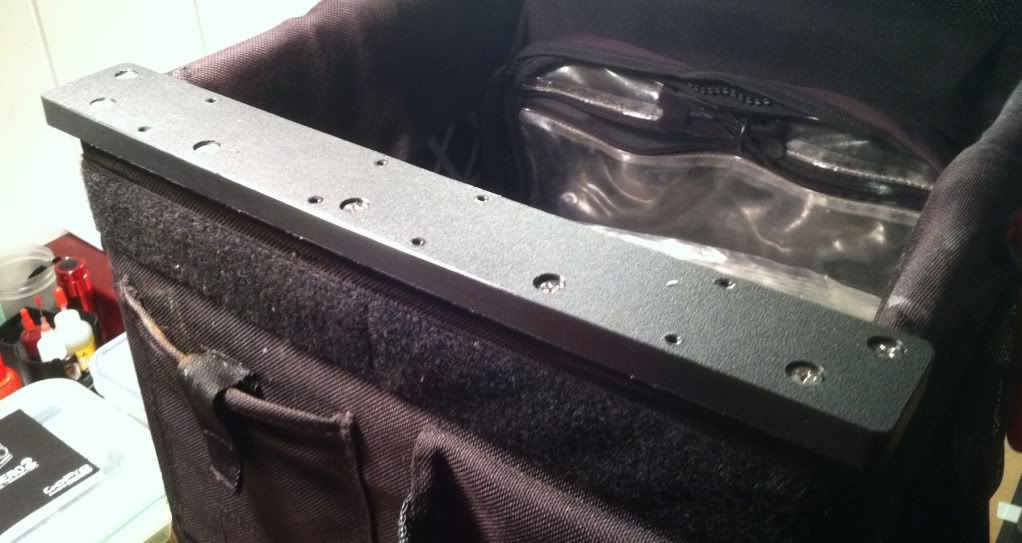 |
| Attached to edge of crate |
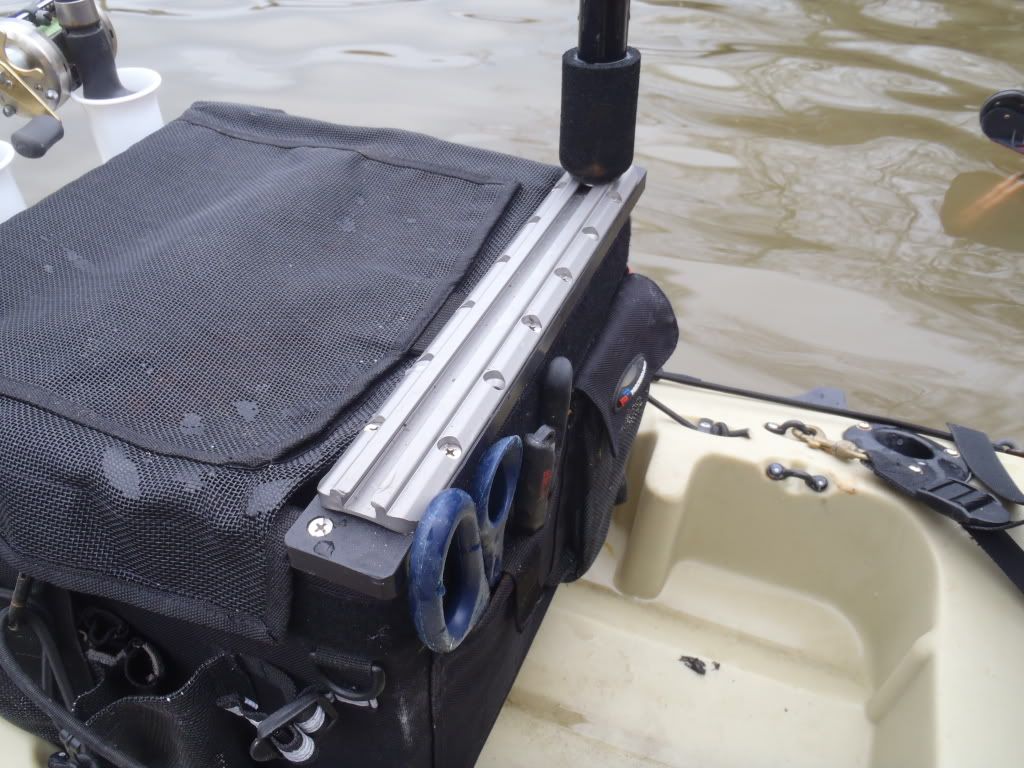 |
| 12" Gear Trac attached on top |
The Panfish and Panfish Portrait slide in and out of the Gear Trac very smoothly. Loosening and tightening the T-bolt is quick and easy. Also, both the Panfish and it's smaller counterpart have a friction plate in the middle so the top portion can rotate while the bottom stays firmly attached to the mounting point. It's a great feature that is really the namesake of the products, since you can "pan" the view.
Also, as I mentioned before, the Gear Trac offers many options for mounting, and I believe that the crate is a great elevated platform to take advantage of those options. From the Screwball and various RAM products, to the new Dogbone for extra versatility, the possibilities are endless.
Check out YakAttack's site for the full scoop on all their innovative products.
However, with all that being said, I still feel the need to utilize an apparatus I created a few years ago. I told Luther about it and he understands my affinity for it.
My extending mono-pod has come in handy on countless occasions and I rarely get on the water without it. If you haven't noticed throughout the video already, I almost always have it sitting in the flush mount rod holder behind me.
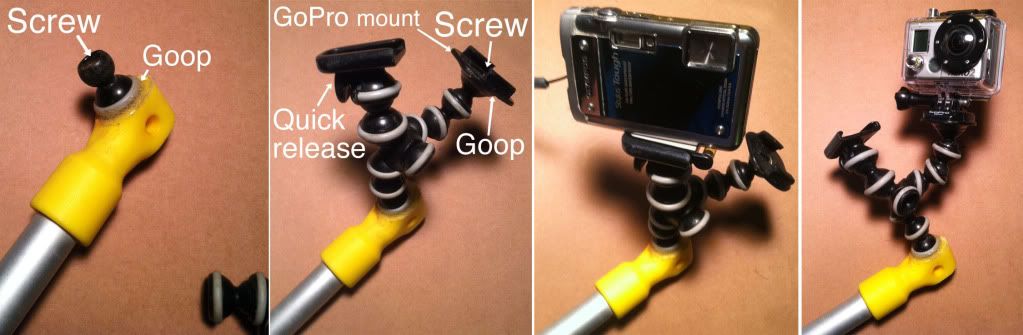
It's essentially just a retractable aluminum pole with
Gorilla pod parts on the end. I took a
telescoping mini paddle and cut off the paddle blades and wrapped that end with electric tape. I also cut off the excess parts of the handle. The ball legs of the Gorilla pod pop off with a certain amount of force. I screwed the ball onto where the handle of the paddle used to be, then popped the rest of the adjustable leg back on. I made sure to get the Gorilla pod that had the quick release attachment so I can easily separate the camera and operate it manually (zoom). Then I also took one of the many GoPro mounts that came with the camera and attached it to the third leg of the Gorilla Pod. All hardware is self-tapping stainless steel and
Goop was applied to the joining pieces.
Unlike many other products, I can change the angle of the camera with just one hand. The Gorilla pod parts stay stiff enough to hold the camera in place, but I can also quickly and easily adjust the angle, rotate or reposition without putting down my rod. Although I don't recommend making it a habit, I have bumped and scraped it on bridge pilings many times, and much to my satisfaction, it has held up great.
Like I said earlier, the mono-pod stays in the flush mount rod holder behind me most of the time. There's a groove at the bottom of the rodholder and the flap that remains after cutting off the paddle blades fits right in. That keeps the mono-pod from spinning in the holder. A lot of over shoulder scenes where you hear me talking, including the Red Drum fight starting at 1:06 was shot using the mono-pod and Olympus Tough 8010.
When I want to snap a picture of myself with a photo worthy fish I place the mono-pod in a Scotty rod holder in front of me and set the timer. The electrical tape adds just enough thickness so it doesn't slip out of the rod holder. For smaller fish, I can keep the mono-pod short and for larger fish, I can send the camera farther away by extending the tube.
While shooting video, the mono-pod has the advantage of being very mobile, since it's not attached to anything. You can quickly take it out of the rod holder and bring the camera to the subject instead of always trying to bring the subject to the camera. This is especially handy when filming your fishing buddy with his catch (1:27). Also, all the underwater scenes in the video were captured using the mono-pod. Being able to extend it from 22" to 42", not only allows you to get the camera deep under water, but you can also capture footage from a higher vantage points(1:53). And since most small cameras have little to no zoom capability, having the few extra feet can help you get those close up shots.

Also, to creating some unique perspectives, I can put it in a Scotty or RAM rod holder behind me to capture some wide side view footage. If I angle the rod holder down, I can also get continuous underwater footage. All the while, at any time, I can still reach behind, undo the latch on the rod holder and pull the mono-pod and camera out with one hand if I need to.
All in all, the Panfish and Panfish portrait are the stationary mounts that I rely on for consistent footage. For everything else, I enjoy using my mono-pod and every once in a while I'll use the GoPro headstrap.
Many of you probably think that most of the things in this long post is overkill, but I really enjoy seeing other people's videos that show many different angles and creative views. So I try to put out what I myself like to see.
I hope you all found something useful in this post and I look forward to seeing some of your great kayak fishing action in the near future.